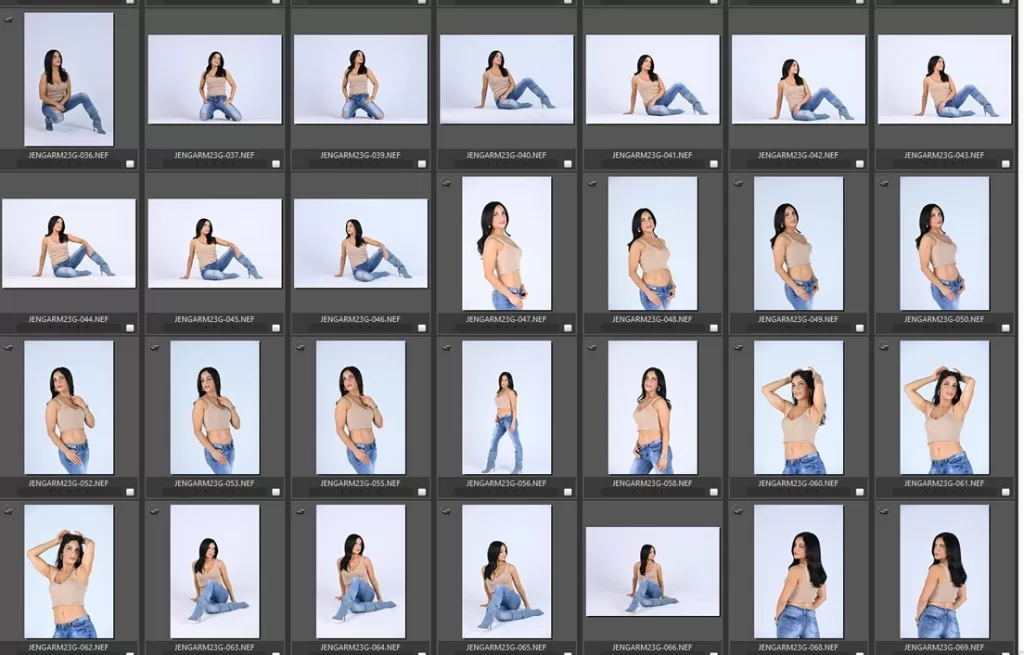
As a photographer with over two decades of digital shooting under my belt, I have a working library of a staggering 68TB of storage stacked on my desk, I’ve come to appreciate the nuanced yet assertive process of post-shoot culling. For me, this isn’t just about data management; it’s a thoughtful exercise in quality control and artistic focus.
Why Post-Shoot Cull at All?
The act of Post-Shoot Cull culling might seem daunting, especially for photographers just starting out. In the early days of a photography career, it’s common to hold onto every image captured – the hits and the misses. Every photo feels like a step in your journey, a memory, a learning curve. Yet, as your portfolio grows, the need to be more selective becomes increasingly important.
Photography isn’t just about capturing a multitude of moments; it’s about telling a story, and not every shot tells your story effectively. Keeping every single image can lead to a cluttered portfolio. It’s like having a bookshelf filled with books you’ll never read again; it takes up space and makes it harder to find the books you truly love and want to show off.

In the digital world, this issue is magnified. Think about storage – with the growing size of digital files, managing space becomes a real concern. Regular culling helps keep your digital library manageable and organized. It’s not just about saving space on your hard drives; it’s about making your best work easily accessible and avoiding being overwhelmed by the sheer volume of less impactful images.
More than that, culling is a learning process. It’s about developing your eye for what works and what doesn’t in your photography. Which images stand out? Which ones represent your style and vision? It’s through this process of careful selection that you really start to refine your skills and understand your artistic voice.
So, culling isn’t about losing memories; it’s about focusing on quality, not quantity. It’s about building a collection of work that truly showcases your talent. For any photographer, whether just beginning or with years of experience, culling is a vital step in your artistic journey, helping you balance your emotional attachment to your work with the practical needs of a professional in a visually-driven world.

My Trusted Tools
- Photo Mechanic V6: This software is my first stop in the culling process. It’s been a staple on my desktop for years, providing unmatched efficiency. Learn more about Photo Mechanic here.
- Lightroom Classic: After narrowing down my selection in Photo Mechanic, Lightroom is where I bring my images to life. Check out Lightroom Classic here.
- Photoshop Beta 25.x: For those final touches that require a deeper dive, Photoshop is my go-to. It’s where the magic happens. Discover Photoshop here.
The Culling Process – Photo Mechanic
My post-shoot culling process is a dance of ruthless efficiency and keen attention to detail. With Photo Mechanic, I adopt a two-pass method. The first pass is aggressive – if an image doesn’t instantly spark joy or interest, it’s out. The second pass involves a reverse journey from the end of the shoot back to the beginning. This is where I look for missed opportunities, duplicates, and most importantly, tack-sharp focus and clarity. Typically, by the end of this, I’ve reduced my keepers by about half to two-thirds.
During this process, I employ a system of grading and color-coding. Three to five stars indicate potential, while additional color tags scream ‘look at me.’ I also add metadata for context, further refining my selection.
The first pass while stringent, is grounded in a fundamental principle: an image must not be inherently flawed to make the cut. During the initial pass in Photo Mechanic, my focus is on identifying and eliminating any images that are clearly subpar. This means discarding shots that are out of focus, poorly composed, or just lack the basic aesthetic appeal. It’s less about each photo being a masterpiece and more about ensuring there are no obvious technical or compositional errors.

I look for critical elements like sharp focus, especially in portraits where eye clarity is key, and overall composition that feels balanced and pleasing to the eye. If a photo doesn’t meet these basic criteria, it’s removed from the selection. This stage of culling is less about artistic brilliance and more about filtering out the misfires – those shots where the timing was off, the lighting didn’t work, or the subject wasn’t quite ready. It’s all about about honing in on the essentials of a good photograph. It’s an exercise in identifying what fundamentally works and what doesn’t. It’s a skill that I’ve developed over time, focusing on the technical aspects of photography that lay the foundation for artistic growth. This first pass is crucial in building a collection of viable images that are technically sound, upon which I can then apply a more creative lens in the subsequent stages of my workflow.
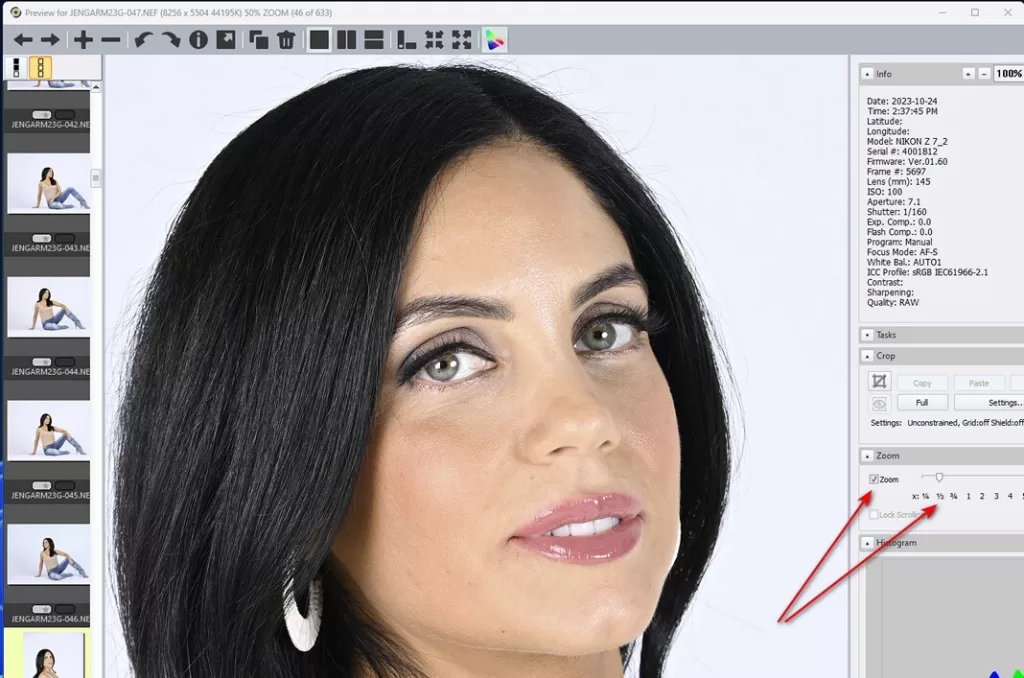
The second pass takes me on a reverse journey, starting from the end of the shoot and working my way back to the beginning. This step is more analytical. I’m searching for elements I might have missed the first time – subtle details, hidden gems, or even potential issues. I look for duplicates, ensuring I don’t have repetitive shots, and scrutinize each image for the technical perfection I’m looking for in my results, particularly tack-sharp focus and impeccable clarity. Since I use a multi-display setup my preview is on my 2nd screen and I set my Zoom to 1/2 After this thorough review, my collection of chosen images is typically reduced by about half to two-thirds, leaving only the best.

Throughout this entire process, I use a systematic approach to grading and color-coding. Ratings from three to five stars help me categorize images based on their potential and immediate impact. Images marked with additional color tags are those that demand a second look, often due to their unique qualities or because they perfectly encapsulate the essence of the shoot. Alongside this, I infuse metadata to each image, adding layers of context – be it location, subject, or the story behind the shot. This not only aids in organization but also embeds a narrative into my digital library, turning it into a well-curated collection of stories and experiences.
This methodical approach to culling is integral to my workflow. It’s a process that ensures my final portfolio showcases not just photographs, but stories that resonate, images that linger in the viewer’s mind, each one a testament to my journey and vision as a photographer.
Moving to Lightroom
After the my rigorous culling process in Photo Mechanic, I transition to Lightroom Classic for the next critical phase. Before importing, I meticulously name and number each series, ensuring every image is easily identifiable and cataloged for future reference. This step is not just about organization; it’s about preparing for a smooth workflow in Lightroom.
In Lightroom, the significance of managing catalog size becomes clear. With today’s high-resolution images, each catalog can grow quite large, potentially impacting Lightroom’s efficiency. By importing only the pre-selected images, I keep the catalog lean and more manageable, ensuring quicker load times and smoother editing sessions. This is crucial for maintaining a streamlined workflow, especially when dealing with multiple projects simultaneously.
Once in Lightroom, the editing process begins. Even within this refined collection of images, some photos may not hold up to closer scrutiny. During this stage, I employ a critical eye, flagging images that require further review or deleting those that no longer meet the standards set by the initial cull. This ongoing process of selection and elimination is key to maintaining a high-quality portfolio.
Lightroom Classic has become a mainstay in my editing process, handling approximately two-thirds of my editing workload. Its comprehensive toolset allows for a wide range of adjustments – from tweaking white balance to intricate tonal corrections and cropping. The ability to batch process images saves invaluable time, and the non-destructive nature of edits in Lightroom ensures that the original files remain intact.
In this stage, efficiency and precision are my priorities. Each adjustment in Lightroom is a step towards realizing the final vision for each photograph. By keeping the catalog optimized and focusing only on the best images, I ensure that my time in Lightroom is both productive and creative.
Final Touches in Photoshop: The Personal Touch
Once the streamlined selection from Lightroom is ready, the final leg of my post-shoot process takes me into the realm of Photoshop Beta 25.x. In Photoshop, the focus shifts from broad strokes to fine details – it’s where the real artistic polish is applied to each image.
Photoshop’s advanced toolset allows for a level of precision and creativity that is unparalleled. Here, I can delve into intricate retouching, composite work, or add those subtle enhancements that elevate a good image to a great one. Whether it’s refining textures, adjusting contrasts, or playing with color grading, Photoshop gives me the latitude to express my creative vision down to the pixel.

While I rely on a talented team of editors for the bulk of detailed editing work, my personal involvement in Photoshop is about adding that signature touch. It’s an opportunity to infuse each image with a piece of my artistic identity. This might involve fine-tuning the lighting, tweaking the color balance, or adding a certain flair that aligns with my style.
This stage of the process is not just about technical perfection; it’s also deeply personal and artistic. It’s where I connect most intimately with my work, taking the time to ensure that every final image not only meets my standards for quality but also resonates with the unique aesthetic that defines my photography.
In Photoshop, each click and adjustment is a part of the story I want to tell through my images. It’s where the culmination of all the previous steps comes together, resulting in a work of art that is ready to be shared with the world.
The Philosophy Behind the Cull
In the world of photography, every image tells a story, but not every story needs to be told. This is the guiding philosophy behind my approach to the post-shoot cull.
In the era of high-resolution photography, where raw files from 36-50 megapixel cameras can easily exceed 40MB each, space has become a premium commodity. This reality amplifies the importance of the post-shoot cull. Why hold onto work that will never see the light of day? When each unused image occupies valuable space, the cost isn’t just measured in gigabytes or terabytes; it’s also a matter of efficiency and focus.
My gallery, or portfolio, is more than just a collection of images; it’s a curated exhibition of my best work. Every time I look through it, I want to see photographs that capture my skill and vision, not be overwhelmed by ‘maybes’ and ‘almost.’ The culling process is about more than just deleting files – it’s about making deliberate choices that shape the narrative of my artistic identity.
This philosophy extends beyond the mere aesthetic. Each session of culling is an opportunity for self-reflection and growth. It’s a critical look at what I’ve captured: assessing each shot for its compositional strength, emotional impact, and technical precision. This is where I learn the most, identifying areas for improvement and celebrating the shots that hit the mark.
Additionally, in a practical sense, with the file sizes we’re dealing with today, efficient culling is essential for a streamlined workflow. It’s about managing resources wisely, ensuring that my time, energy, and storage are invested in images that truly matter – those with potential for development, client delivery, or portfolio inclusion.
Therefore, the post-shoot cull is not just a task; it’s an integral part of my creative process. It’s about quality over quantity, ensuring that each saved image earns its place both in my storage and in my portfolio. In doing so, I keep my digital library manageable, my workflow efficient, and my artistic output at its highest quality.
Your thoughts? Feel free to reach out to me on my website or join the conversation on Facebook @glenegrant or Threads here.


