Introduction
Adobe continues to revolutionize the digital workflow for photographers with its innovative tools. One such groundbreaking tool is the Adjustment Preset feature in Photoshop 24.6. This feature offers photographers an unprecedented level of customization and control.
With the Adjustment Preset feature, photographers can create, save, and manage their own presets. This allows for consistent adjustments across multiple images, streamlining the editing process. Furthermore, it enables photographers to develop a unique style that can be consistently applied, enhancing their brand identity.
A standout feature is the ability to save presets as a Color Lookup Table (LUT), making it compatible with other applications like Premiere Pro and After Effects. This cross-application compatibility is a significant advantage for photographers who work across different platforms.
Alternatively, adding presets to the Photoshop library provides a fully editable solution. This gives photographers the flexibility to fine-tune their presets as needed.
In this blog post, we’ll explore the specifics of the Adjustment Preset feature in Photoshop 24.6. We’ll guide you through the process of creating, saving, and managing your own presets. Regardless of whether you’re a novice or a seasoned Photoshop user, this feature opens up endless possibilities for customization and creativity. Let’s get started!
Getting Started with Photoshop 24.6’s Powerful Adjustment Presets
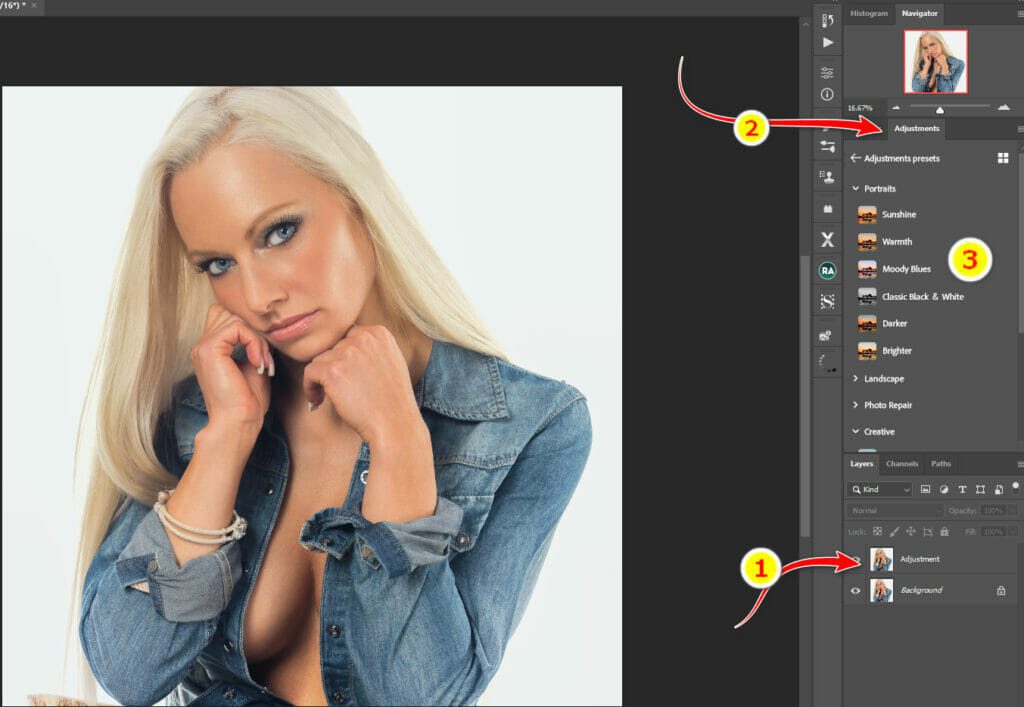
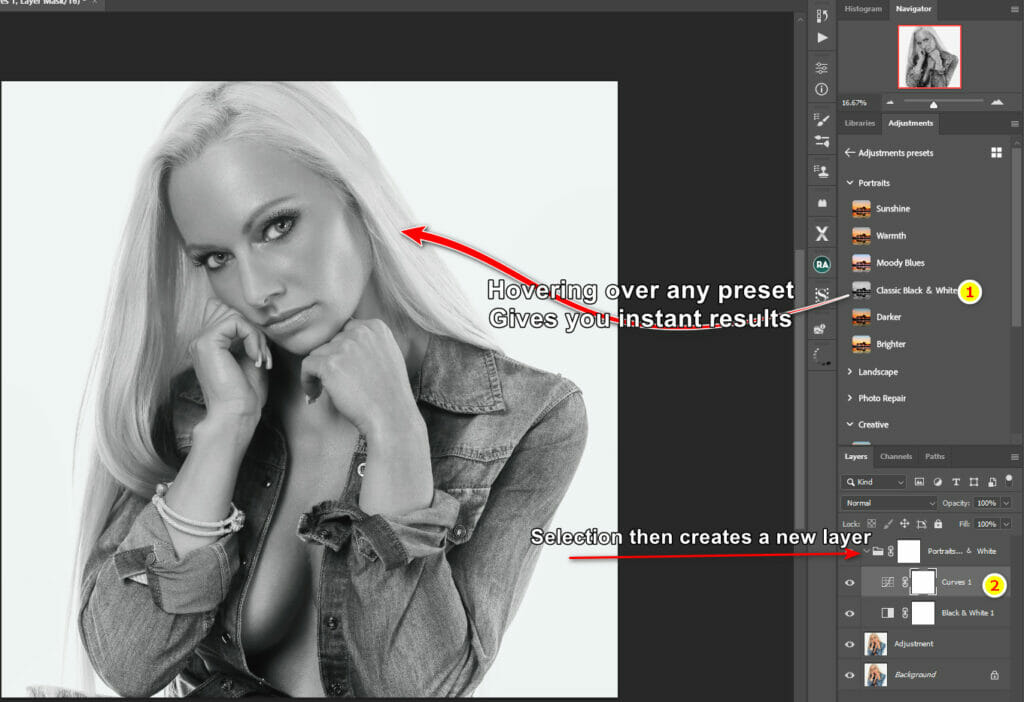
To begin, open an image in Photoshop and navigate to the Adjustments tab. Here, you’ll discover the new Adjustment Preset feature. As you hover over the different categories of presets, you’ll get a preview of how each one can transform your image. Applying a preset is as simple as a click, and it instantly creates an adjustment layer. (Image 1)

Creating Your Own Preset
The real magic of the Adjustment Preset feature in Photoshop 24.6 unfolds when you start creating your own presets. This process allows you to tailor your adjustments to your specific needs and preferences, offering a level of customization that can truly elevate your photography.
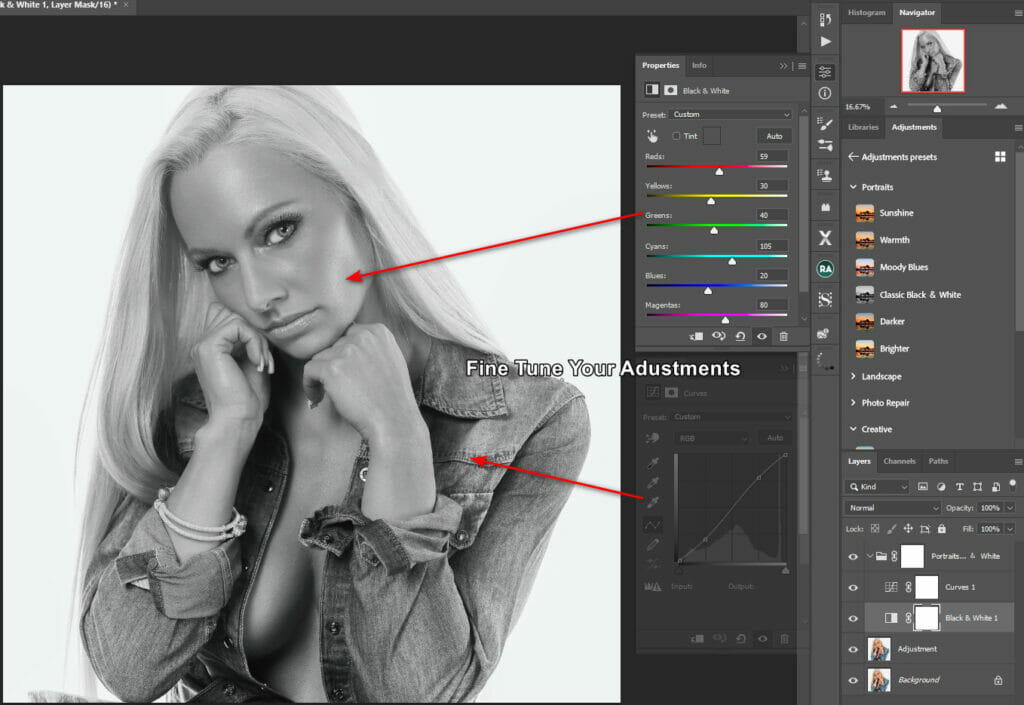
To create your own preset, you’ll first need to add a new adjustment layer. This can be done by navigating to the ‘Layer’ menu, selecting ‘New’, and then ‘Adjustment Layer’. Once your new layer is in place, you can start making your desired modifications. This could involve adjusting the hue to alter the overall color cast of your image, tweaking the saturation to enhance or mute colors, or modifying the contrast to alter the difference between the lightest and darkest areas of your image. The possibilities are endless, and the adjustments you make will depend on the look you’re aiming to achieve.

After you’ve made your adjustments, the next step is to group this layer with any other layers you want to include in your preset. This could include other adjustment layers, or even layers containing elements like text or shapes. To group your layers, simply select the layers you want to include by holding down the CTRL key (or Command key on a Mac) and clicking on each layer. Once your layers are selected, press CTRL + G (or Command + G on a Mac) to group them together. This group of layers now forms your custom preset, which can be applied to other images with a single click.

Saving Your Custom Preset
After you’ve spent time meticulously adjusting and fine-tuning your image to create the perfect look, the next crucial step is to save your custom preset. This allows you to reuse the same adjustments on other images, ensuring consistency and saving time in your editing process. In Photoshop 24.6, there are two main methods to save your custom presets:
Method 1: Save as a Color Lookup Table (LUT) in Photoshop 24.6
The first method to save your custom presets in Photoshop 24.6 involves using Color Lookup Tables, commonly referred to as LUTs. This technique is a widely used approach in the world of photo and video editing, and it’s recognized for its versatility and compatibility with various applications.
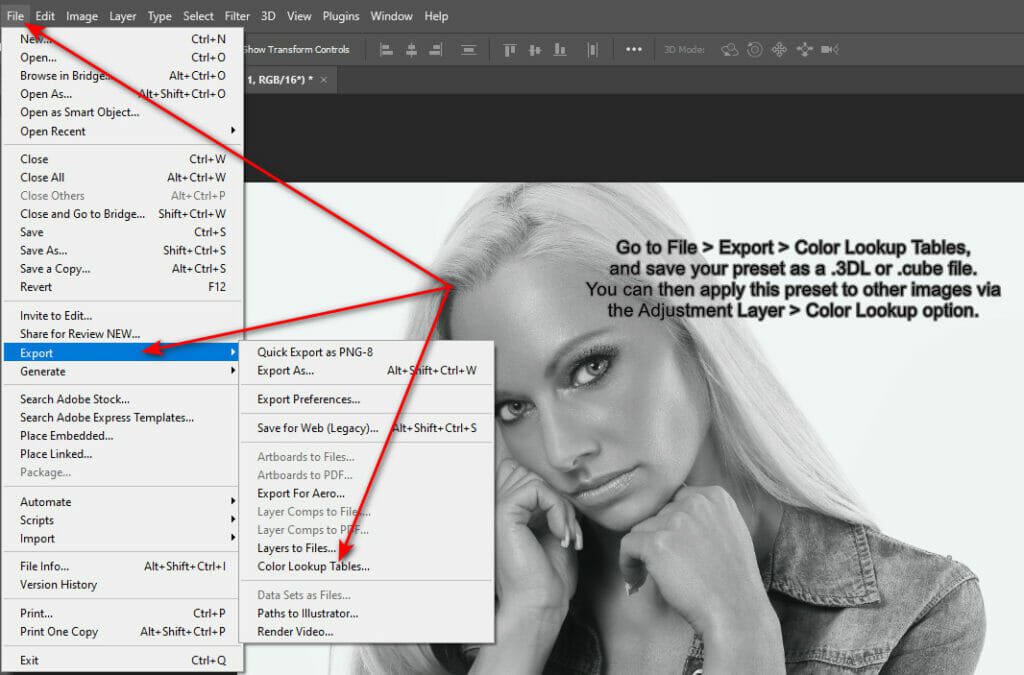
To save your preset as a LUT, you’ll need to navigate through the Photoshop 24.6 interface. Start by going to the ‘File’ menu, then select ‘Export’, and finally choose ‘Color Lookup Tables’. This will open a dialog box where you can name your preset and choose the format you want to save it in. Photoshop 24.6 offers two options: .3DL and .cube. Both formats are widely used and compatible with most photo and video editing software.
Once you’ve saved your preset as a LUT, applying it to other images is a breeze. Simply go to the Adjustment Layer menu, select the ‘Color Lookup’ option, and choose the LUT you’ve created. Your preset will be instantly applied to your image, transforming its look based on the adjustments you’ve saved in the LUT.
One of the main advantages of this method is its cross-platform compatibility. LUTs created in Photoshop 24.6 can be used in other applications like Premiere Pro and After Effects. This means you can create a consistent look across different projects, whether you’re editing photos for a digital album or creating visual effects for a video.
However, it’s important to note that this method does have a downside. Once a preset is saved as a LUT, you can’t adjust its parameters individually. This means that the hue, saturation, contrast, and other adjustments you’ve made are set and can’t be tweaked when the LUT is applied to an image. Despite this limitation, saving presets as LUTs in Photoshop 24.6 is a powerful method that offers convenience, consistency, and wide-ranging compatibility.

Method 2: Add to Your Photoshop Library
The second method for saving your custom presets in Photoshop 24.6 involves a more integrated approach, which is adding your group of adjustments directly to your Photoshop library. This method is particularly useful if you plan to use your custom presets frequently or if you have a collection of presets that you want to keep organized and easily accessible.
To add your group of adjustments to your library, simply select the group and then choose the ‘Add to Library’ option. This will save your group of adjustments as a single entity in your library, making it easy to locate and apply whenever you need it.
One of the standout features of this method is the ease with which you can apply your preset to other images. All it takes is a simple drag and drop action from the library onto your image, and voila, your preset is applied. This drag-and-drop feature not only makes the application of presets quick and easy but also allows you to experiment with different presets on your image without having to navigate through multiple menus.
Another significant advantage of this method is that it’s fully editable. Unlike saving your preset as a Color Lookup Table (LUT), adding your preset to your library allows you to tweak and fine-tune your preset even after it’s been saved. This means you can adjust the hue, saturation, contrast, or any other parameter of your preset as needed, giving you the flexibility to adapt your preset to different images or to refine your preset as your editing style evolves.
Managing Multiple Adjustment Layers
Working with multiple adjustment layers in Photoshop 24.6 can seem daunting at first, especially when you’re dealing with complex projects that require a variety of adjustments. However, Photoshop provides several tools that make managing these layers more straightforward and efficient.
One such tool is the layer collapsing feature. By holding down the CTRL key (or Command on a Mac) and clicking the little arrow next to your adjustment layers, you can collapse all layers into a more compact view. This not only makes your workspace less cluttered but also gives you a clearer overview of all your layers, making it easier to navigate through them.
Another useful feature when managing multiple adjustment layers is the eye icon next to each layer. By dragging through the eyes, you can quickly turn off all presets, allowing you to view your original image without any adjustments. This is particularly useful when you want to compare your edited image with the original or when you want to audition your presets one at a time. By turning on the eye icon for one layer at a time, you can see the effect of each preset on your image, helping you decide which preset works best for your project.
It’s important to remember that these presets are not set in stone. They are fully editable and can be fine-tuned to your liking. This means you can adjust the hue, saturation, contrast, or any other parameter of your preset as needed, giving you the flexibility to adapt your preset to different images or to refine your preset as your editing style evolves.

Conclusion
The Adjustment Preset feature in Photoshop 24.6 is more than just a tool – it’s a gateway to a new realm of creative possibilities. It empowers you, whether you’re a beginner finding your footing or a seasoned pro, to customize your projects in ways that were previously unimaginable.
This feature is not just about making adjustments; it’s about making your mark. It’s about defining your unique style and consistently applying it across your work. It’s about streamlining your workflow, saving you time and effort that you can invest in your creative exploration.
So, don’t wait any longer. Dive into the world of Adjustment Presets today and discover how this powerful feature can elevate your creative projects to new heights. Remember, in the realm of creativity, the sky is not the limit; it’s just the beginning. Happy exploring!
For more on the latest release notes for Photoshop


